
Mastering Model Lighting: Essential Factors for Ecommerce Studios
Mastering the complexities of lighting tests in an ecommerce studio, specifically for OnModel shoots, requires a systematic approach. This comprehensive guide, complemented by our Virtual Lighting series, provides valuable insights for optimising lighting changes for ecommerce brand storytelling, product detail pages (PDP), and seasonal photography.
For context (as FT manager) Kevin initiated full lighting design changes for AmazonFashionEU (including digital storefronts for brands such as Boss Orange) and a complete lighting redesign for TopShop. This process outlines the recommended steps for in-house content creators in ecommerce, offering a concise overview of the key factors that should inform your lighting test procedures.
1. Identify why change is needed
If the request is not coming from the top down and is self initiated from within the Studio or Photo team, create a document showing trouble areas. For example, imagery that had to be reshot, or how brand story can be enhanced by lighting changes. Competitor analysis may also be a great place to start.
Building solid visual data is a strong way step toward positive conversations.
2. Identify Stakeholder Expectations
The next step is to clarify what Test Success looks like for stakeholders. Without a clear and agreed target, there is a risk of chasing vague improvements that do not align with business objectives. Onboard, engaged Stakeholders free up resources, timelines and budget.
The bigger the brand, the more support you may need for any change.
3. Consider Evergreen vs. Seasonal Impact
Evaluate the longevity of the changes. Are you looking for a seasonal lighting setup or one that will serve you long-term for PDP. If so then, for example, will you need to reshoot Evergreen imagery such as Denim or basics.
The cost impact of long term change must be considered.
4. Define the Test Objectives
Communicate clear understanding of the lighting test's purpose, whether it's resolving an existing issue or amplifying brand story through reappraisal. Stay focused on goals and resist temptations to flex creative muscle without direction. Documented concepts should guide the process to success.
Develop a robust brief.
5. Resource Planning
Proper resource planning is vital when model photography is required, in coordination with Production. Have model resources for a day, half day etc and brief the talent accordingly. A good test will incorporate models with different skin tones and for various (relevant) categories like swimwear. Testing takes time to refine, over numerous days and models.
Grabbing talent from a neighbouring set spreads frustration.
6. Engage with Post Production from the start
If this is handled in-house as feedback will be invaluable ensuring the test is beneficial for the entire workflow. Ideally bring them in at points 2 or 5. Post Production should also feedback on highlights, thresholds, background consistency, colour comparisons giving overall clarity.
Prioritise open communication with the Post Production team.
7. Control Variables within the set
For example, if a Key Light is adjusted, demonstrate results before adjusting another light, analyse the changes and impacts first. Understanding how you got somewhere is key by working through changes methodically. Many tests have been ruined by taking non logical steps. Know the elements of control in your tests.
Ecommerce consistency thrives on known outcomes.
8. Clear File Naming
Reviewing Contact Sheets after a test, it can be easy to forget the relationship between lighting changes and final images. The solution is in process steps, ensuring changes are documented in Metadata or File naming. For example try adding KeyLightOctaGrid_ or KeyLightOctaDoubleSilk_ in the Capture1 data. A grey card can also be used like a clapper board, ie hang an identifier for each new sequence and shoot a frame. Post Production will really appreciate this level of order as a clear basis for comparison later.
Structure and a digitech will win the day.
9. Use Grey Cards / Colourcheckers
Grey Cards are essential for standardisation, but the use should be controlled. Did you know that Grey Cards age and degrade over time? For any testing, use the same Grey Card throughout, and placement is key. We have added some images below to show aspects that would be good to consider. Set a standard, that will be replicated on each day of the trial, or each new testing bay set-up.
The grey card is your point of origin.


10. Full-Range Product Testing
Test the impact on various fabric types (neons, reflective) and a wide range of products, for example, does a winter Puffer jacket shoot as well as a bodycon dress. Planning a rail in advance with Styling is crucial and feeds back to point 3 about model selection.
The closer the set-up gets to perfect, the more you should try and break it and find outliers.
11. Consult your SME’s
Like with Post Production, get the knowledge you need on set, a Stylist will build a great rail, and a strong HMU team should be involved from the start. Helping to moodboard, and create seasonal looks, and overall hmu that works with new lighting is so important, yet easily overlooked.
Bring the talent you need into the discussion early.
12. Equipment Calibration
Ensure monitors are calibrated at the start of the test and camera profiles are consistent. When a test spans multiple days, book the same equipment to maintain control, and be aware of any presets or hard baked recipes that may be in place within software such as Capture1.
Consistency loves calibrated equipment!
13. Colour Match to Mannequin
The gold standard in ecommerce is the colour match at the flat lay/mannequin or still life set. This is always the area of most control and is not affected by variables such as individual fit or movement / pose of the model. Validate any results with this gold standard and swatch looking for colour shift. Some brands focus less on colour consistency for Model shots but comparisons should be made for Stakeholders.
Colourmatch to non-model, not vice versa.
14. Test on All Relevant Sets + Design for Outliers
If you are working at scale, always keep in mind the outliers, such as the smallest set. How will the design layout work for this area, especially with Lighting. So work from the basis of the smallest set, (if in regular use). When multiple sets are involved and they are not modular, confirm that the new lighting setup works consistently across all of them. To be accurate on non-modular sets make measurements of vital equipment to replicate, this may involve putting tape down, having drop lines from modifiers etc to refine results. Consistency is key.
Its easier to scale up than it is to reduce down. Everything you do should be scalable.
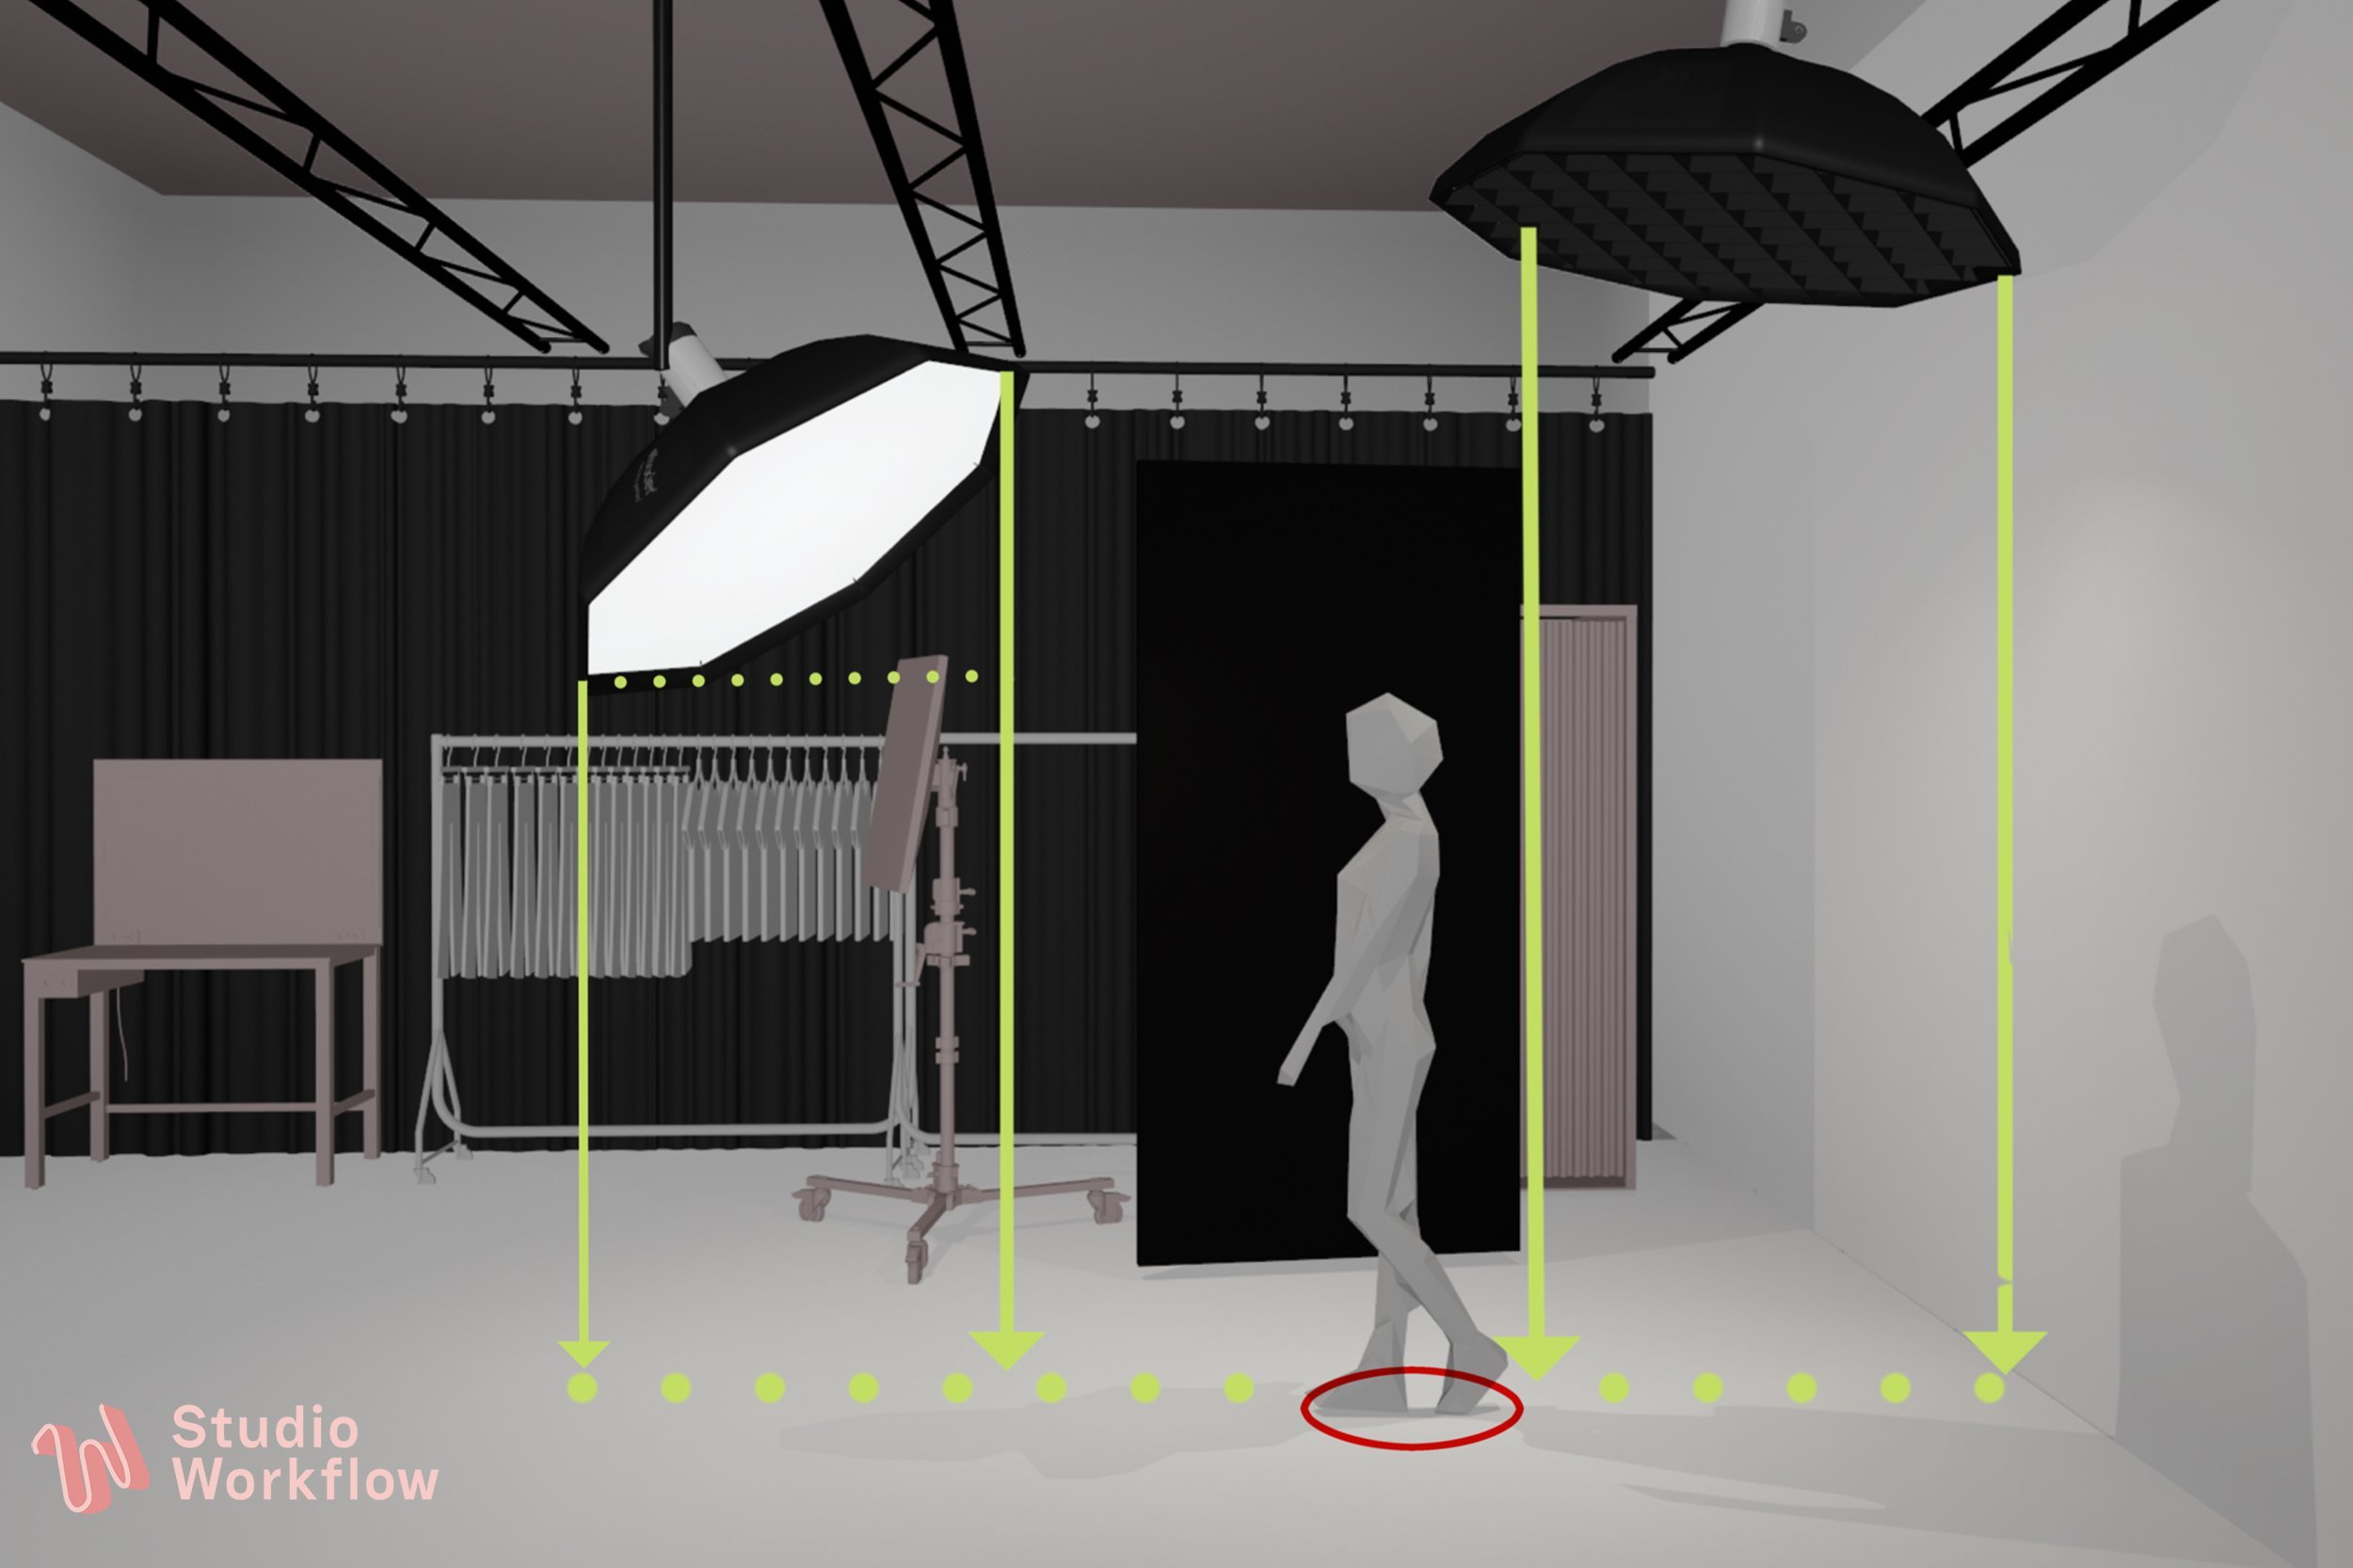
15. Document Everything As You Go
We are big fans of measuring, taping and measuring again. Taking wide shots of the set, marking angles of modifiers and measuring drop heights to the floor. Test each and every light in your set-up separately and show the results in a document. This is a great time to also involve feedback, from the team. It can also be useful to show what didn’t work, its a valuable learning tool.
Measure twice, set up once.
16. Make a really clear Lighting Diagram
Keep in mind that not everyone that uses your document will retain information in the same way so combine 2D imagery with valuable text and 3D models and show final images whenever possible.
Ideally make a 3d Lighting Model.
17. Third-Party Impact
If your ecommerce platform incorporates third-party or vendor imagery, assess how the new lighting setup will impact this workflow, does supplied imagery also need to change? How will the new refreshed imagery look when next to Vendor imagery on curated pages? If you outsource content creation of product at peak, are vendors able to achieve the proposed changes and will you need to brief them.
Communicate the impact of change in advance.
18. Pick the right Images
We have seen great lighting rejected (or sent back for more work) purely because a stakeholder was focused on another aspect, pose/styling/hmu etc. If you have Art Directors in-house ensure they are onboard with the image selection.
Ideally mimic the ‘Approval to Online’ Process to tell your new Lighting Story
19. The stakeholder document
If you have made a great test, thorough and with documented changes, you should be able to present comparison before and after content. With a good rail of styling, showing the new imagery alongside the existing online inventory is key.
If you are using extra equipment on set, set-up times and costs should be highlighted.
Highlight any downstream impacts, for example extra steps in Post Production and flag the outliers.
Not every stakeholder will intuitively ‘see’ light in the way you do.
20. The Training and Roll Out Team
The team that did the discovery, should be the team that do the roll out and training, they will know the aims, the pitfalls and will have the most engaging knowledge to bring others onboard. This can be an ideal opportunity to showcase team members who are ready for a higher profile. If possible add a Junior team member in to the entire process for shadowing and skills growth.
Help your team to shine!
Summary
Conducting a thorough lighting test for ecommerce is a complex yet rewarding endeavour. One of the key measures of ecommerce brand story is consistency and to be able to answer the key questions -
is this scalable?
how did we get here?
who does the change impact?
how much does this cost?
Following these guidelines will help you maintain control over the testing process, ensuring reliable, actionable results.
This guide provides you with a systematic framework for tackling the complexities of new lighting for OnModel shoots—be it for brand storytelling, product detail pages, or seasonal photography. Every step, from initial planning to stakeholder involvement to detailed testing procedures, is crafted to ensure an outcome that's both reliable and scalable.
We hope this guide is comprehensive, but we're always keen to learn from the collective wisdom of our industry peers.
what would you do differently?
what essential steps do you think we might have missed?
For further insights and ongoing discussions, we invite you to follow us on LinkedIn and join the conversation. Together, we can elevate the ecommerce content creation industry to new heights.